


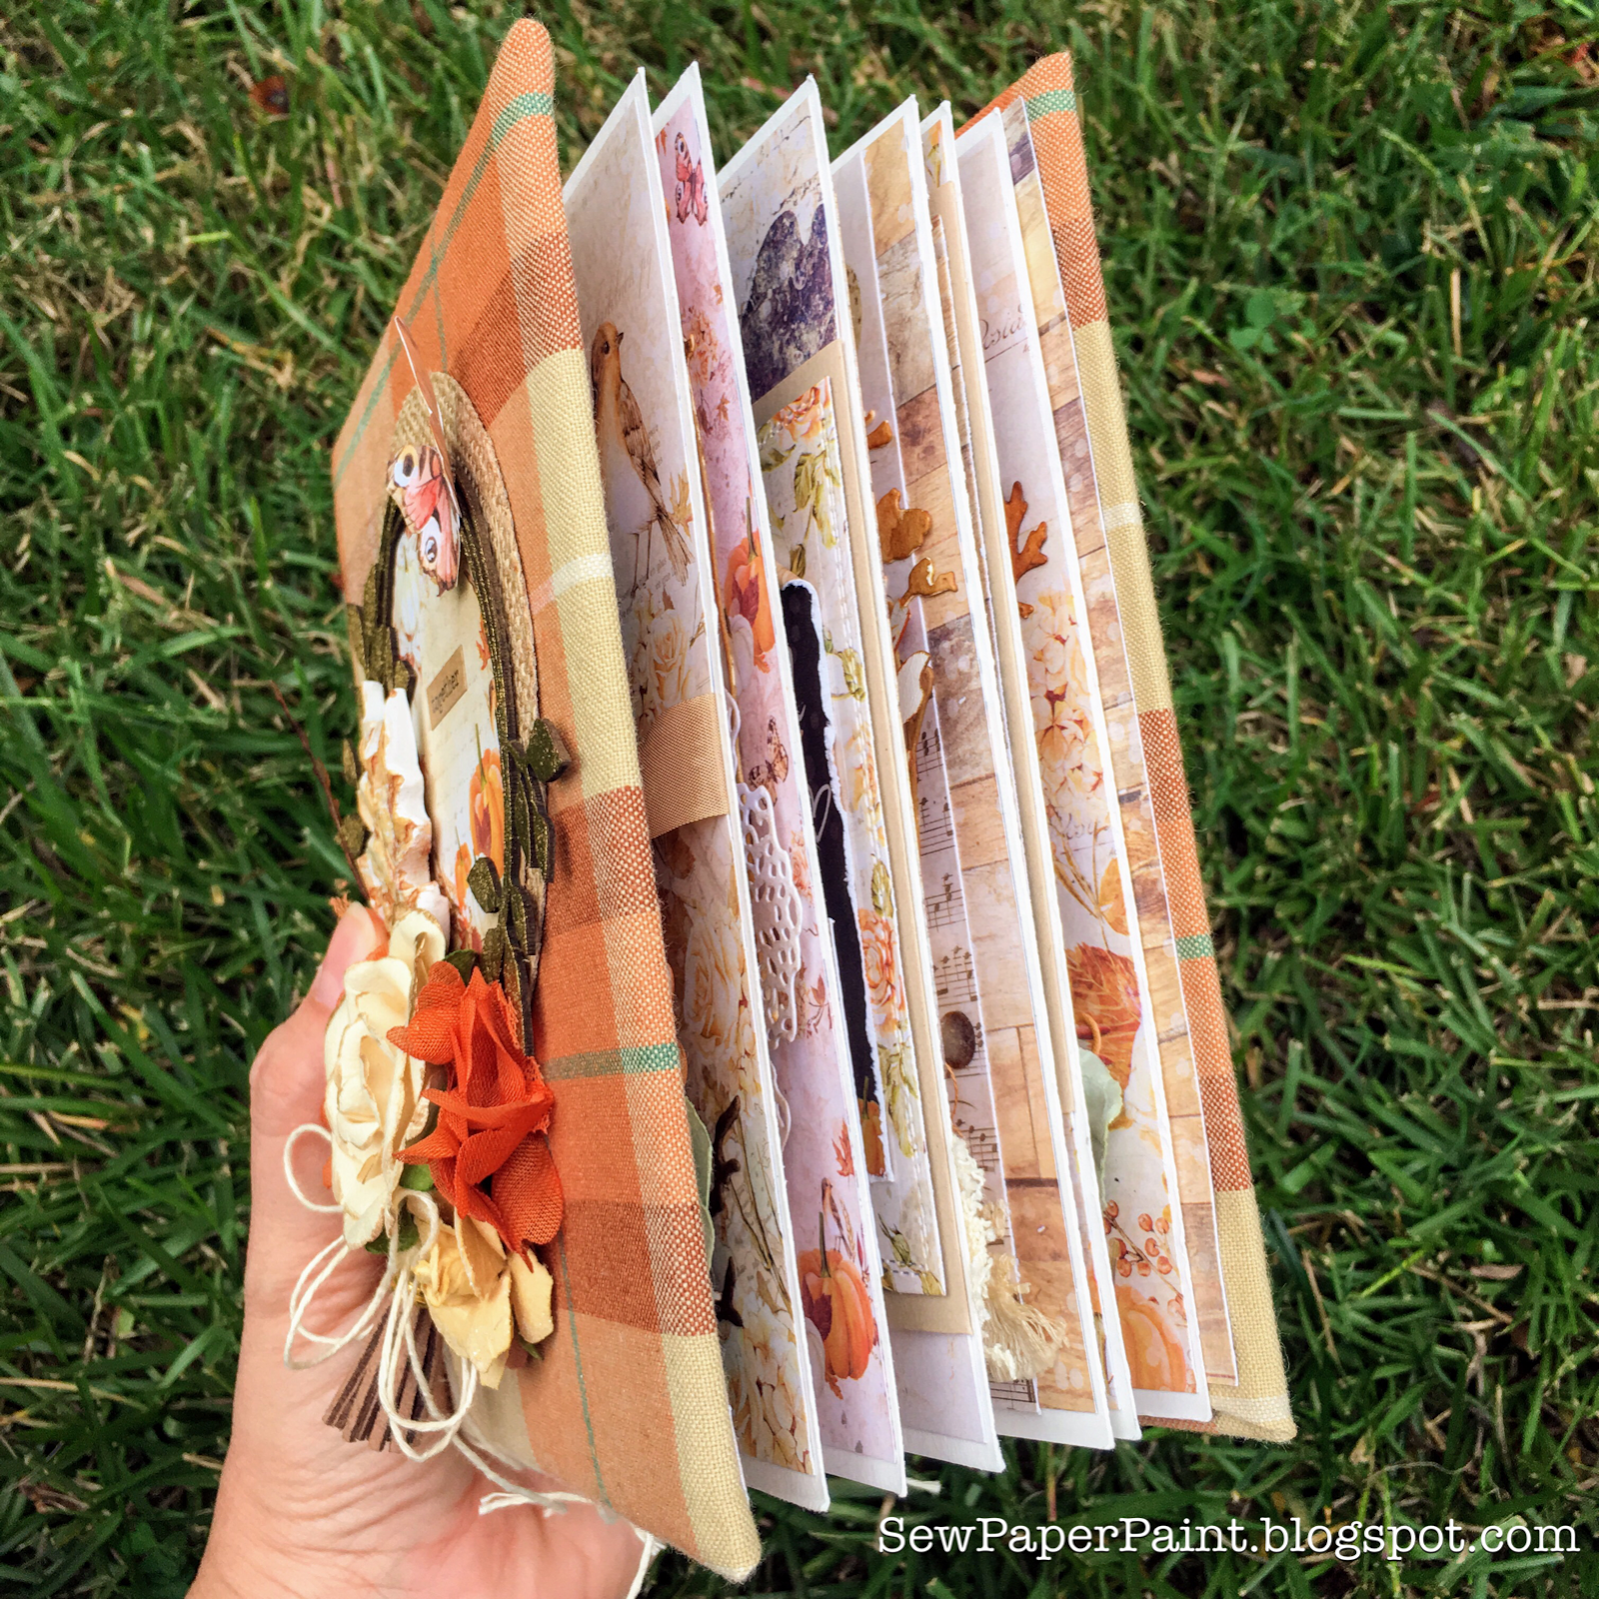
I created a fabric covered mini album featuring the new Prima Marketing Amber Moon collection. I chose fall colored plaid fabric for my cover. I've written a tutorial on making fabric album covers HERE, so check that out if you're interested. My cover features a gold embossed Gypsy Soul Laser Cuts Scribble Frame Leaves.


Now, I'm always looking for easier ways to do just about anything. I wanted to do a nestled binding, but I thought it would be too thick to adhere the pages to flaps like I usually do, so I made continuous pages with built-in flaps.

For a 1/4" gap between pages your signatures will have a gap at the following increments:
Signature 1: 1/4"
Signature 2: 3/4"
Signature 3: 1 1/4" (or 5/4")
Each signature after the first one follows the pattern of adding 2/4" to the last measurement. You could easily add more pages.

My first two pages cut easily. I cut the premeasured length and then scored at the width of each page from either side. For the sheets that didn't fit it into my paper cutter, I first scored a mark the width of my page base and folded. I then cut through both layers at the height measurement.

I used a ruler to mark the length, then lined the markings up with my paper cutter and trimmed.
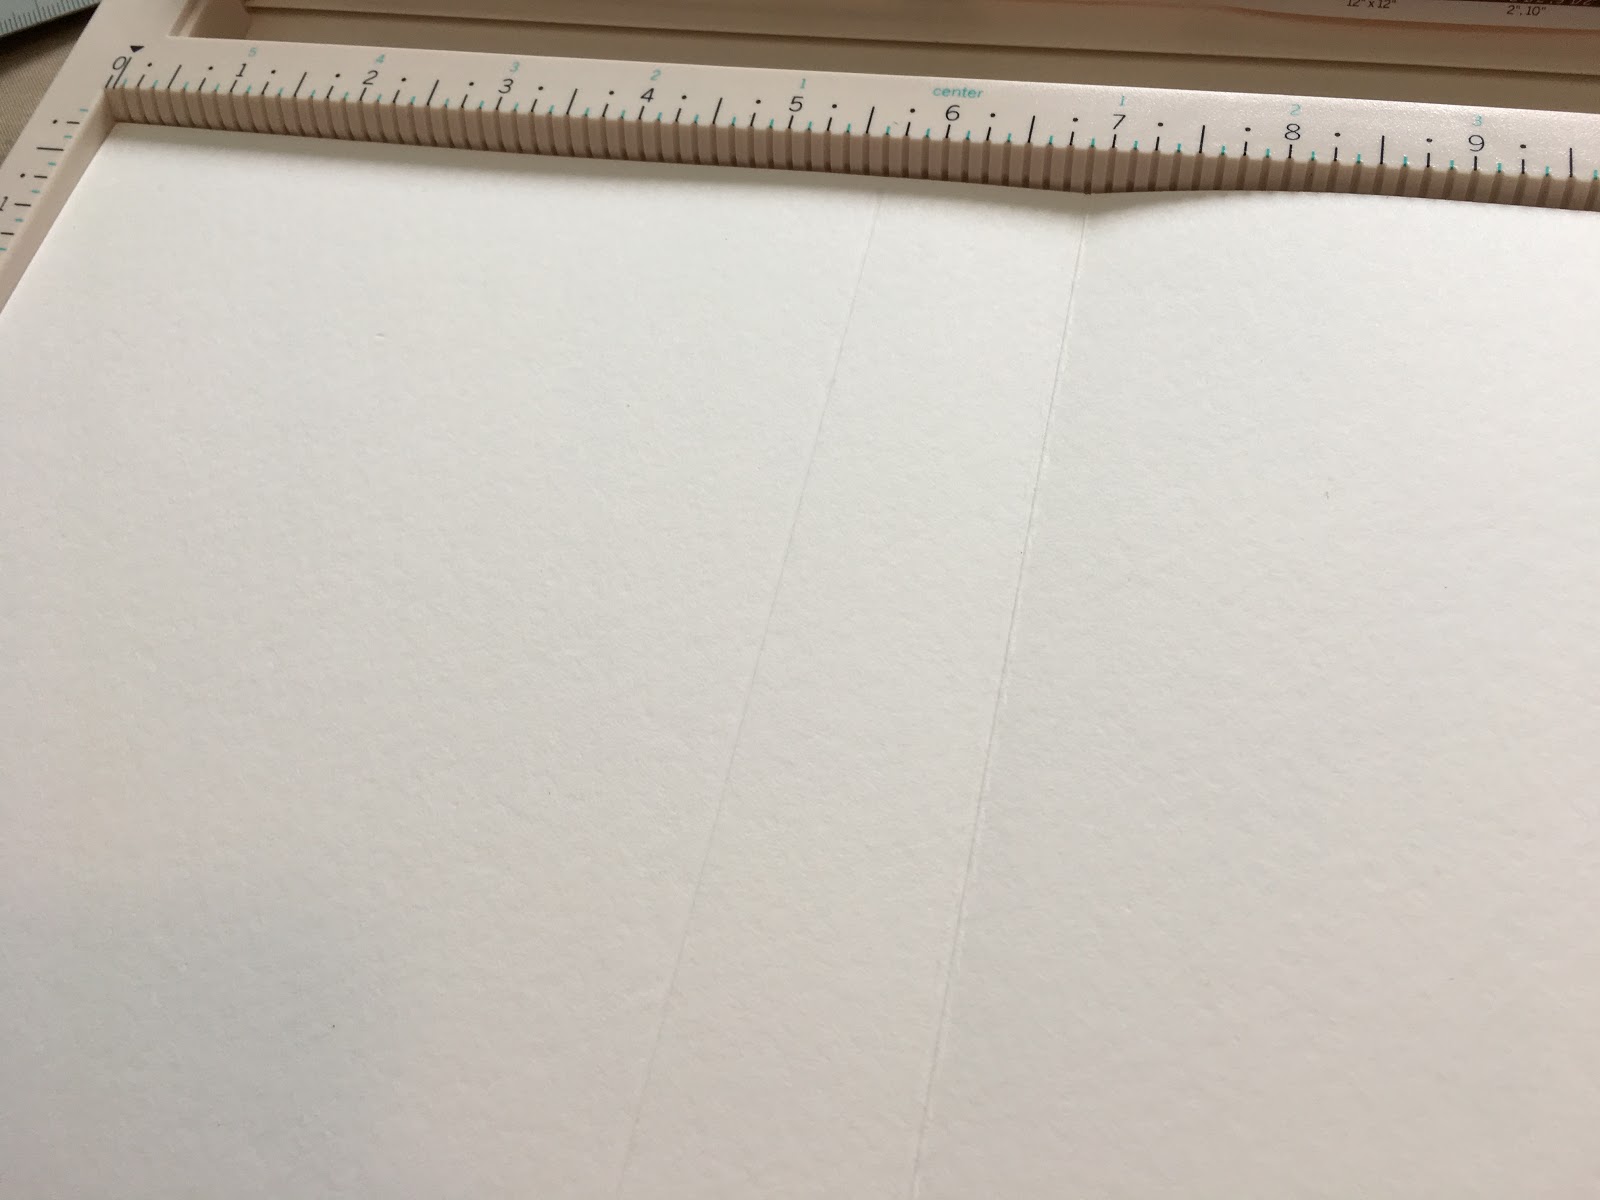
Once you get your sheets cut to the right lengths, you just score at the width of each page from either side.
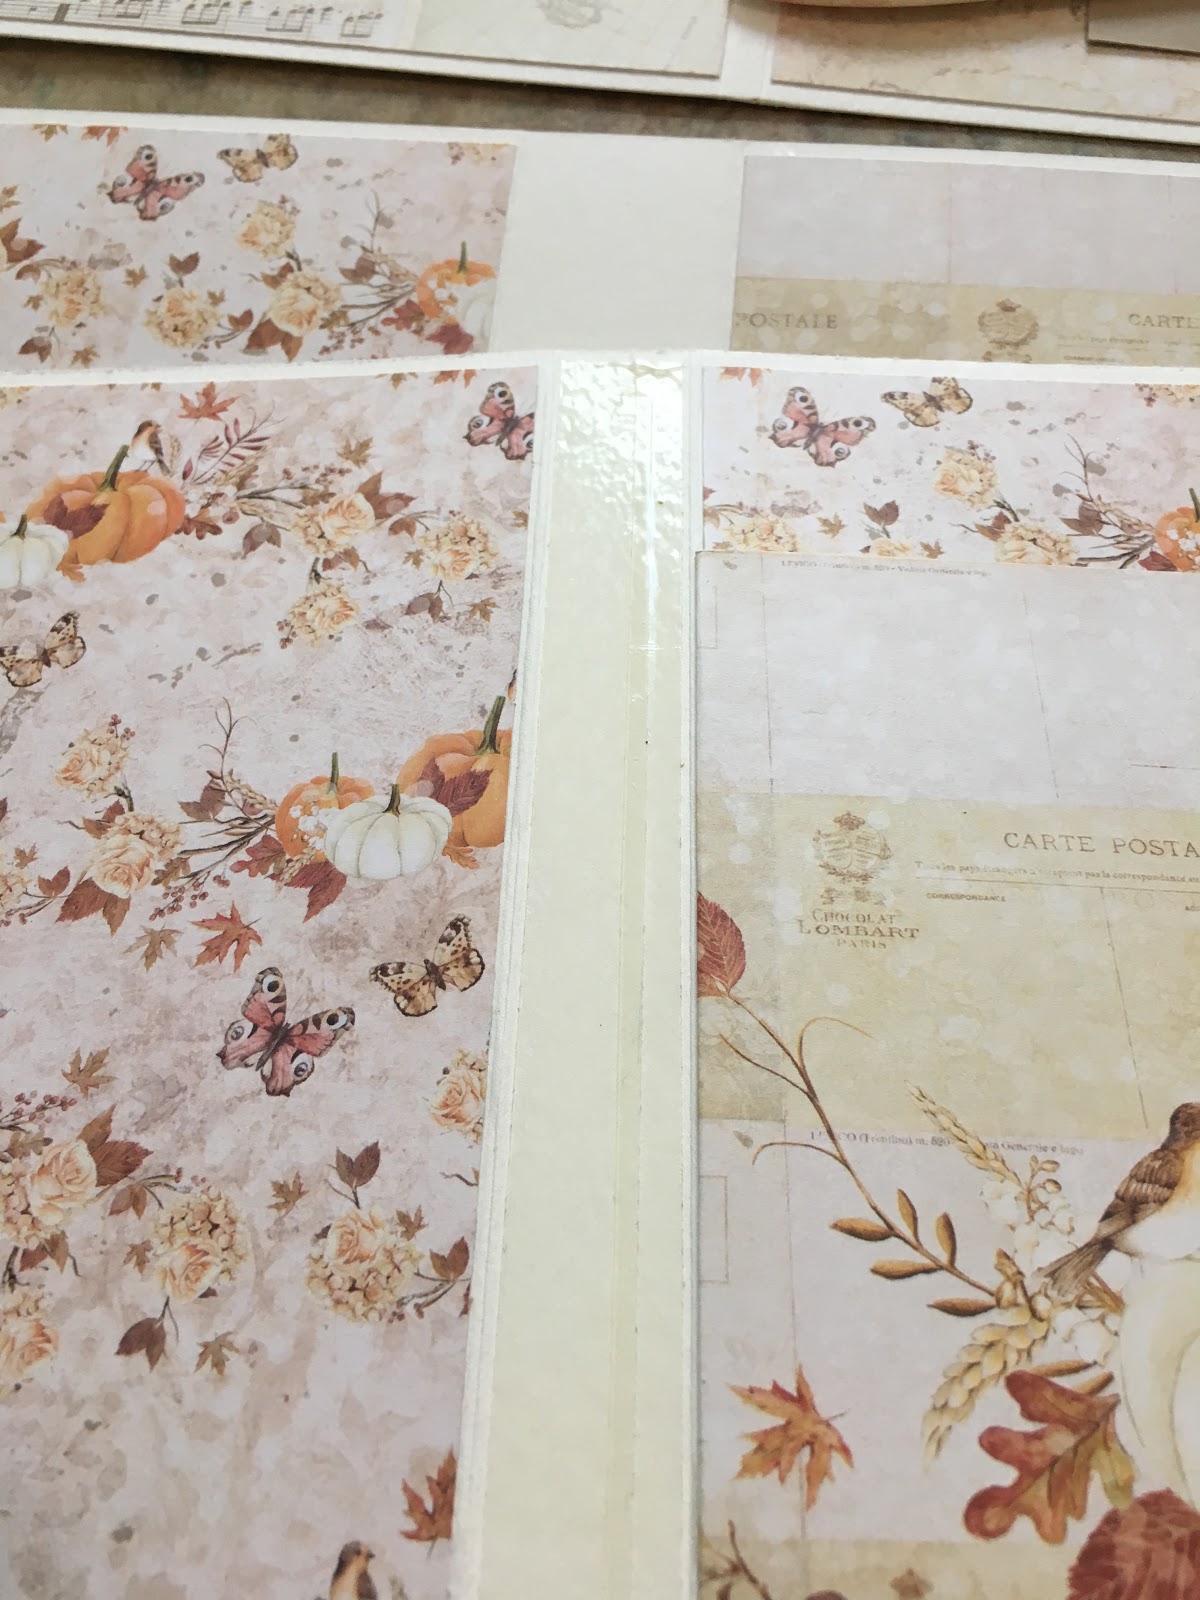
Then adhere your designer paper and flaps and fiddly bits to each panel. Apply red line tape to the backs of the two smaller signatures and adhere them all together.
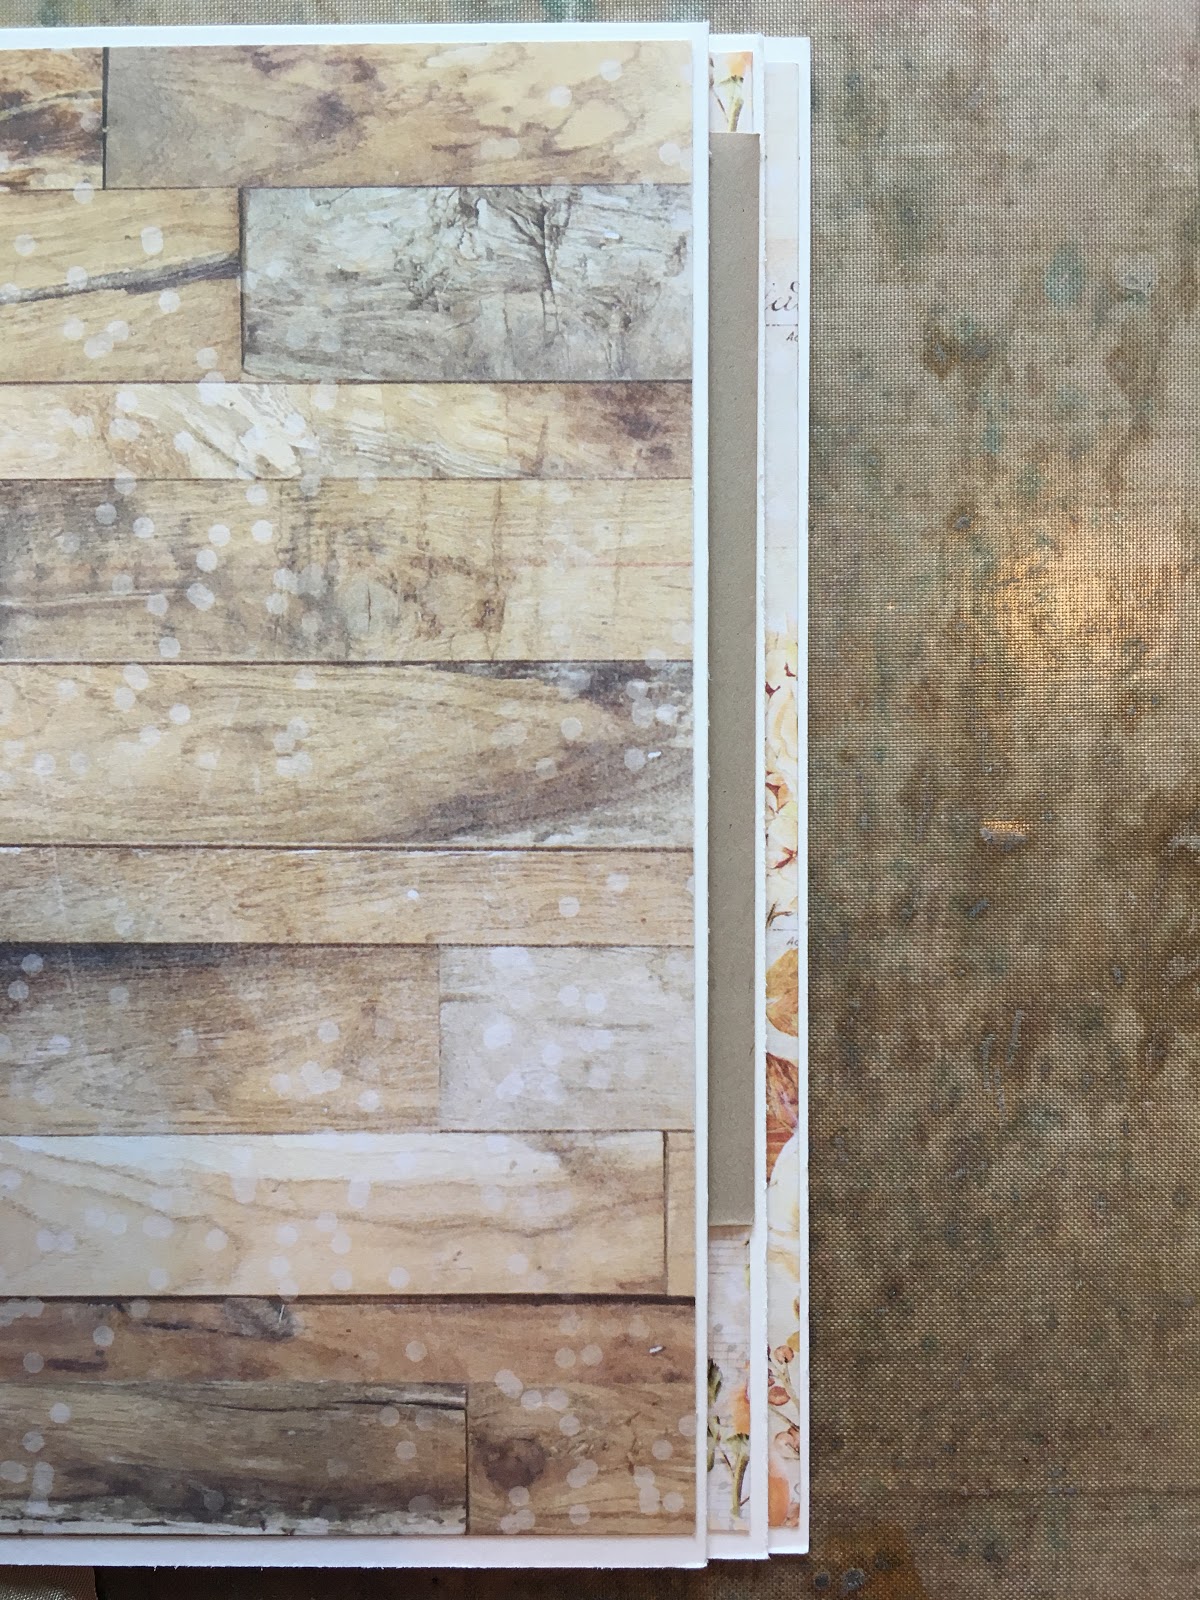
You want the tops and bottoms to line up straight. I use the sides as my guide here, so that the layers have a nice succession of 1/4" inward.

Next I raided my stash for all of my pretties. I find that having everything laid out beforehand is very helpful and makes for a speedier process. I have vintage trims, tons of die cut elements, beautiful chipboard by Gypsy Soul Laser Cuts, and Prima flowers. I decided to ink up all of my dye cuts before starting. I embossed the deer and arrows in gold. As you will see, I had an amazing time using these goodies.

Here are my album measurements for your reference:
Base Pages: 5 5/8 x 7 1/4"
Designer Paper Pages: 5 1/2 x 7"
Covers: 5 3/4 x 7 3/8"
Spine: 1 3/4 x 7 3/8"
Photos 3 x 4"


When you pull this tag the pages flip up. I will try to recreate this and do a separate tutorial.


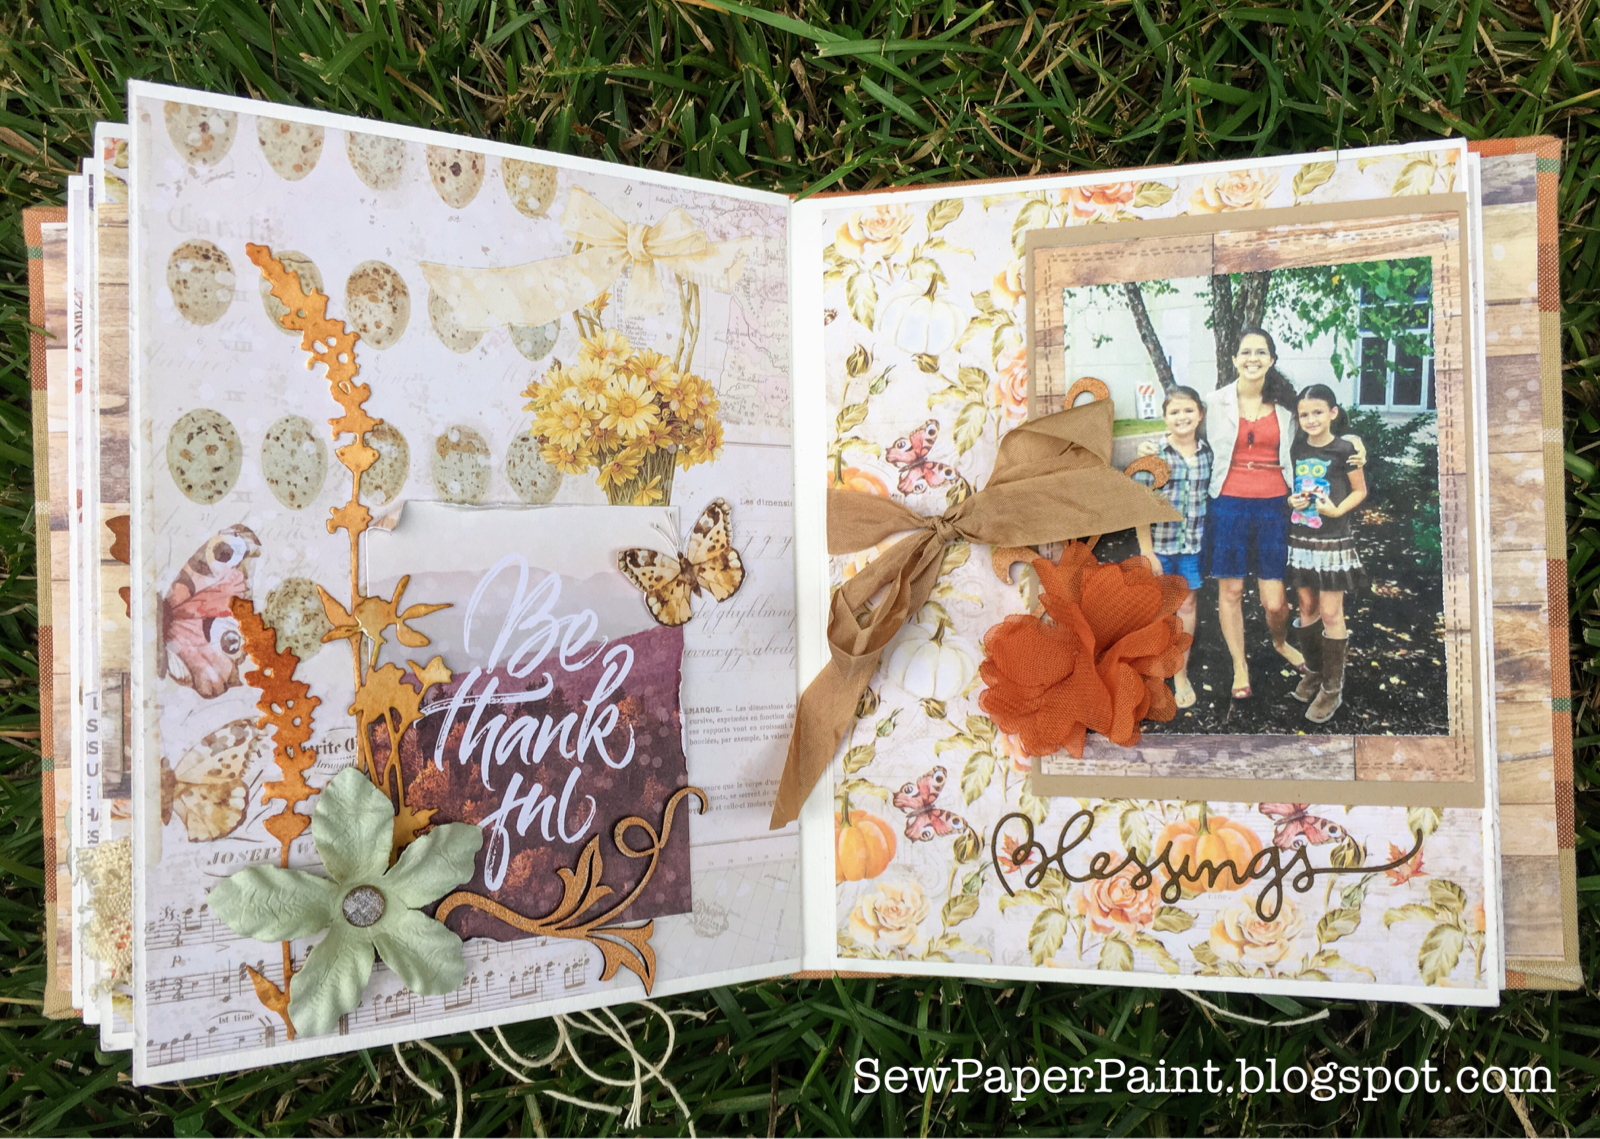

Here I embossed the Gypsy Soul Laser Cuts Mini Flourishes Bella in ginger EP.


As you can see, I had a lot of fun with the interactive elements and embellishments! Perhaps I should have used a 1/2" page gap, because the album almost bursts open. :)
I have definitely made this with love and tried to use photo blanks, but the inspiration wouldn't come until I added my family photos on the pages. I'm so happy with the result and hope that you are inspired to try an album of your own and play in our current challenge. Best wishes!

Find these die cuts and Prima Marketing Amber Moon Products at the Funkie Junkie Boutique:
 |  |  |  |
 |  |  |  |
 |  |  |  |

I'm also sharing with:


36 comments:
What a beautiful way to display both time and treasured memories. Autumn is such an inspirational season and you never cease to amaze me on how you can marry every inch of your embellishments together. I really do hope I find some *ME* time this month to take part in the challenge. Warm Hugs Tracey xx
A beautiful album. So many lovely details. A piece of art!
Love, love, love!
A wonderful tutorial Autumn, I am definitely going to try that method of adding signatures! The plaid cover is gorgeous in those beautiful autumnal colours and each page is a delight. Your enjoyment and pleasure in making this shines through, I love it! Hugs, Anne xx
What an amazing album, Autumn - the fabric cover is so chic and I love all the interactive pockets and pouches and flaps and tabs. Great tutorial details too - here's to another great month of book-making.
Alison x
So wonderful Album ,I love the colours.
So gorgeous details!
A detailed and easy to follow tutorial, so we can play along too, if time permits. Love the tartan cover, the Autumnal theme and the attention to detail, as usual, just bowls me over. Your work is superb. Thanks for the inspiration.
Amazing journal! I love the fabric cover and your layering of elements is so artistic.
Absolutely beautiful journal Autumn! Congrats on the success of your new adventure!
WOW! A really beautiful album with one of my favorite plaids. Thank you.
I love the plaid fabric cover. Thank you for all the instructions. Lovely album.
How beautiful! What a fabulous project!
Oh WOW this is absolutely stunning ! I love the material you have used and all the fabulous details! Thank you for sharing with us a Fussy and Fancy, good luck and I hope you will join us again.
Hugs
Gina xx
You sure do enjoy what you do! Absolutely amazing, full of detail and gorgeous elements. Thank you x
Oh Autumn, this book has the complete wow factor! STUNNING!! I could look at each of the pages for hours, and how wonderful to get a little look at some of your lovely, beautiful family too! A great tutorial and wonderful post, - yay for this new challenge! xxx
Autumn, this is absolutely incredible! I love every detail. You are so talented and I love coming to your blog because I learn something every time. Thank you for always inspiring me!!
This is really awesome! I love the fabric (warm blanket) cover! And the way you stacked the pages is perfect for those lumpy pages! Well done!!
What a beautiful album Autumn - love the colours you have used, and I can understand you saying that you couldn't design the pages until you had your photos there.
Blessings
Maxine
Hi Autumn, gorgeous journal. Great layouts and lovely detail. Happy crafting, Angela xXx
So lovely on the inside and out! I love the colors and the fall theme. Gorgeous!
Kate
Great mini album! I LOVE the fabric cover. I keep meaning to use some fabric on my paper crafting projects but don't get it out. Lovely job.
Amazing work! Details are wonderful and colours are so beautiful. Thanks for sharing the tutorial. LOVE it. Thanks for playing along Simon Says Stamp Anything Goes Challenge. Gayatri xx
Beautiful, as always! I love the plaid.
Oh my!! This album is stunning Autumn!! I adore the fabric cover and the warm autumn colours. Each and every page has the WOW!! factor .. I could flip backwards and forwards for ages just to take it all in! Thank you for the tutorial and the inspiration!! hugs xx
What an absolutely stunning album Autumn. My favourite time of year and all the details on your album are so beautiful.
Thanks for joining in with our Autumn challenge at That's Crafty! and wishing you lots of luck.
Fliss DT x
What an amazing album, and those photographs make it extra special xx
Wow Autumn!! I so love that you show such detailed photos of your journal making- otherwise, I would have no clue on what to do LOL
I have to tell you, How very much I enjoyed looking through these beautiful pages and seeing a glimpse into your family life- it truly is wonderful and you truly are blessed!
lots of love,Jackie xx
Oh. My. Little. Goodness. This is breathtaking, Autumn! The cover is a real work of art with all that wonderful texture and gorgeous design. I'm gobsmacked...really and truly I am! Each page is just filled with lovely, thoughtful details. I do so love your style!
Absolutely gorgeous - inside and out! Can't stop looking at it! And all those precious family photos - an album like this would take me months to put together if I could ever complete it! I just love the homespun feel of the cover too with the checked fabric.
What a fabby book and a great addition to our challenge. Thanks for joining us at Really Reasonable Ribbon. Huggs from Ginny at Polly's Paper Studio!
Gorgeous album! Thanks so much for participating in our Really Reasonable Ribbon Challenge.
Brilliant albumn love the gorgeous material and beautiful papers and embellishments-love all the pics too
Carol x
Wow, fantastic, Autumn isn't only your name, it's also your season, or?!
love your wonderful colour and die combination. Many thanks for such a wonderful inspiration! Kerstin x
Gorgeous Album Autumn filled with such detail and treasured memories also love the fabric cover and embellishments. Will have to try this method of binding soon 😊 thank you for sharing.
MaggieH
Oh, for Pete's sake, Autumn! This has got to be an all time favorite album from your talented hands! First off your design is fabulous and I'm so grateful you shared your instructions! Secondly, the plaid fabric cover has me swooning, as does each and every Autumn themed detail! the waterfall feature is a favorite and I LOVED seeing your family photos! I could sit and flip through this all day! LOVE, LOVE, LOVE this! Sending big hugs!
Ohhhhhhh...... I love this album love your design and style!!😍
Thanks doe your tutorial!
Xoxo
Post a Comment